For a little over a year, I have had these cheap solar lights that mount on the stairs, walls, whatever. In theory (and for the first few months), they worked great. But after one winter they have oxidized so badly that they barely work at all. So, having an old 12V AC landscape lighting system, I decided to try and replace them with something better.
A few years ago I installed LED strips in my son’s room. I thought, why not put those types of lights under the slab steps and on the concrete steps.
So, I found some LED strips that are weatherproof (contained in silicon) and decided I’d given them a go. The problem is, my existing landscape lights use a 12V AC (alternating current – like what you have in a typical outlet but lower voltage) (see here) and the LED strips use 12V DC (direct current).
NOTE: I am not responsible for any modifications you make to lighting and I highly recommend you do your research first and carefully make sure you are always insulating your wires and that you solder your connections well. Improperly connecting electronics can result in a fire or damage to people or property. All of these modifications you make at your own risk.
Here is my parts list:
- 2 Pin 8mm LED Strip Connector – This is used to connect the landscape wiring (item below) to the LED lights
- Warm White LED Strip Lights – This is a 16ft tape of LED lights (I ended up buying 3 for my use). They can be connected to each other to make them longer.
- 2 Conductor 22 AWG Landscape wire 65 ft – This runs from your power source (in my case the converter) to the LED lights
- 120 Watt Powerpack with sensor and timer (Optional) – I already had this available to me. But I thought I’d include it in case you don’t have any power for landscape lights. It just plugs into a standard outdoor outlet.
- 36W Outdoor Waterproof Low Voltage Converter – This converts your 12V AC to 12 DC. Now, I took this a step further, because I felt the lights were still too bright, and I added the adjustable buck converter below to dim my lights by lowering them to 8V DC. For those who don’t know a buck converter just lowers DC voltage from one level down to another.
- In-line Mini Buck Converter (Optional) – This is a great little buck converter that I used to “dim” my lighting.
- Heat Shrink Tubing – I sealed my wires with this after I soldered them and I also contained my mini buck converter in them.
Tools recommended:
- Wire cutters / strippers
- Soldering iron
- Solder (rosin core)
- Hot glue gun
- Heat shrink gun
- Multimeter
First, let’s talk about voltage. As I stated above, the (original) landscape wiring used 12V AC. Now, will this work with the LED strips? Yes. But I don’t recommend it. It makes them extremely bright and the 50Hz cycle (50 cycles per second) makes the LEDs flicker at an extremely fast rate. You want (at least I wanted) soft white, steady glow. This is why all the effort in the voltage conversion.
Now, above you’ll see that I’ve recommended also adding an in-line buck converter. This basically solders to the voltage converter output and then feeds the LED strips from there (See schematic below). You’re going to be sealing this in a weatherproof heat shrink tubing, so it is important that you make sure it’s dialed in at the voltage (dimming) that you want it at, because once it’s sealed – it’s sealed for good.
Schematic:

Here’s how I did it all:
- Figure out exactly where you will put your LED stips and measure the strips and lengths of wire needed. Technically, you can wire the LED strips in series if you want (end to end), but for ease of hiding my wiring, I chose to wire mine in parallel (wire to wire with the LEDs at each junction).
- Once you have all your lengths down, cut everything to size.
Important Note: Be sure to cut the LED strips on the cut marks (little copper dots inside the silicon – Fig 1 below). - Next, I worked on the power. As seen above in the schematic. I soldered the AC/DC converter to the landscape wiring and encased them in heat shrink tubing. (Don’t forget to put the shrink tubing on before you solder)
- I connected the DC end of the AC/DC converter to the “In” on the buck converter.
- Next, I soldered the first length of 22AWG 2 conductor wire to the other end of the buck converter.
- I then connected an LED line temporarily so that I could adjust the voltage on the buck converter (I found that 8V seemed to work best).
- Next, I sealed the entire buck converter in shrink tubing (Fig 4)
- Then I soldered the first length of 22AWG wiring to the LED connector.
- I then stripped the silicon off the first 1/2 CM of the LED strip so I could slide it into the connector (Fig 2 & 3)
- I then peeled back the adhesive on the LED strip and stuck it to the bottom of my step slab. It’s stone, but it stuck just fine.
- Next, I tacked the wiring on the side of the steps with a glue gun (Fig 5) under a bush so that you couldn’t really see it.
- A few days later I checked to see where the adhesive was pulling away and used a glue gun to tack in that area.

Fig 1 – the LED copper dots to cut at

Fig 2 – peeling back the silicon

Fig 3 – sliding in the LED strip

Fig 4 – Buck converter sealed in shrink tubing

Fig 5 – Wiring along back side of steps

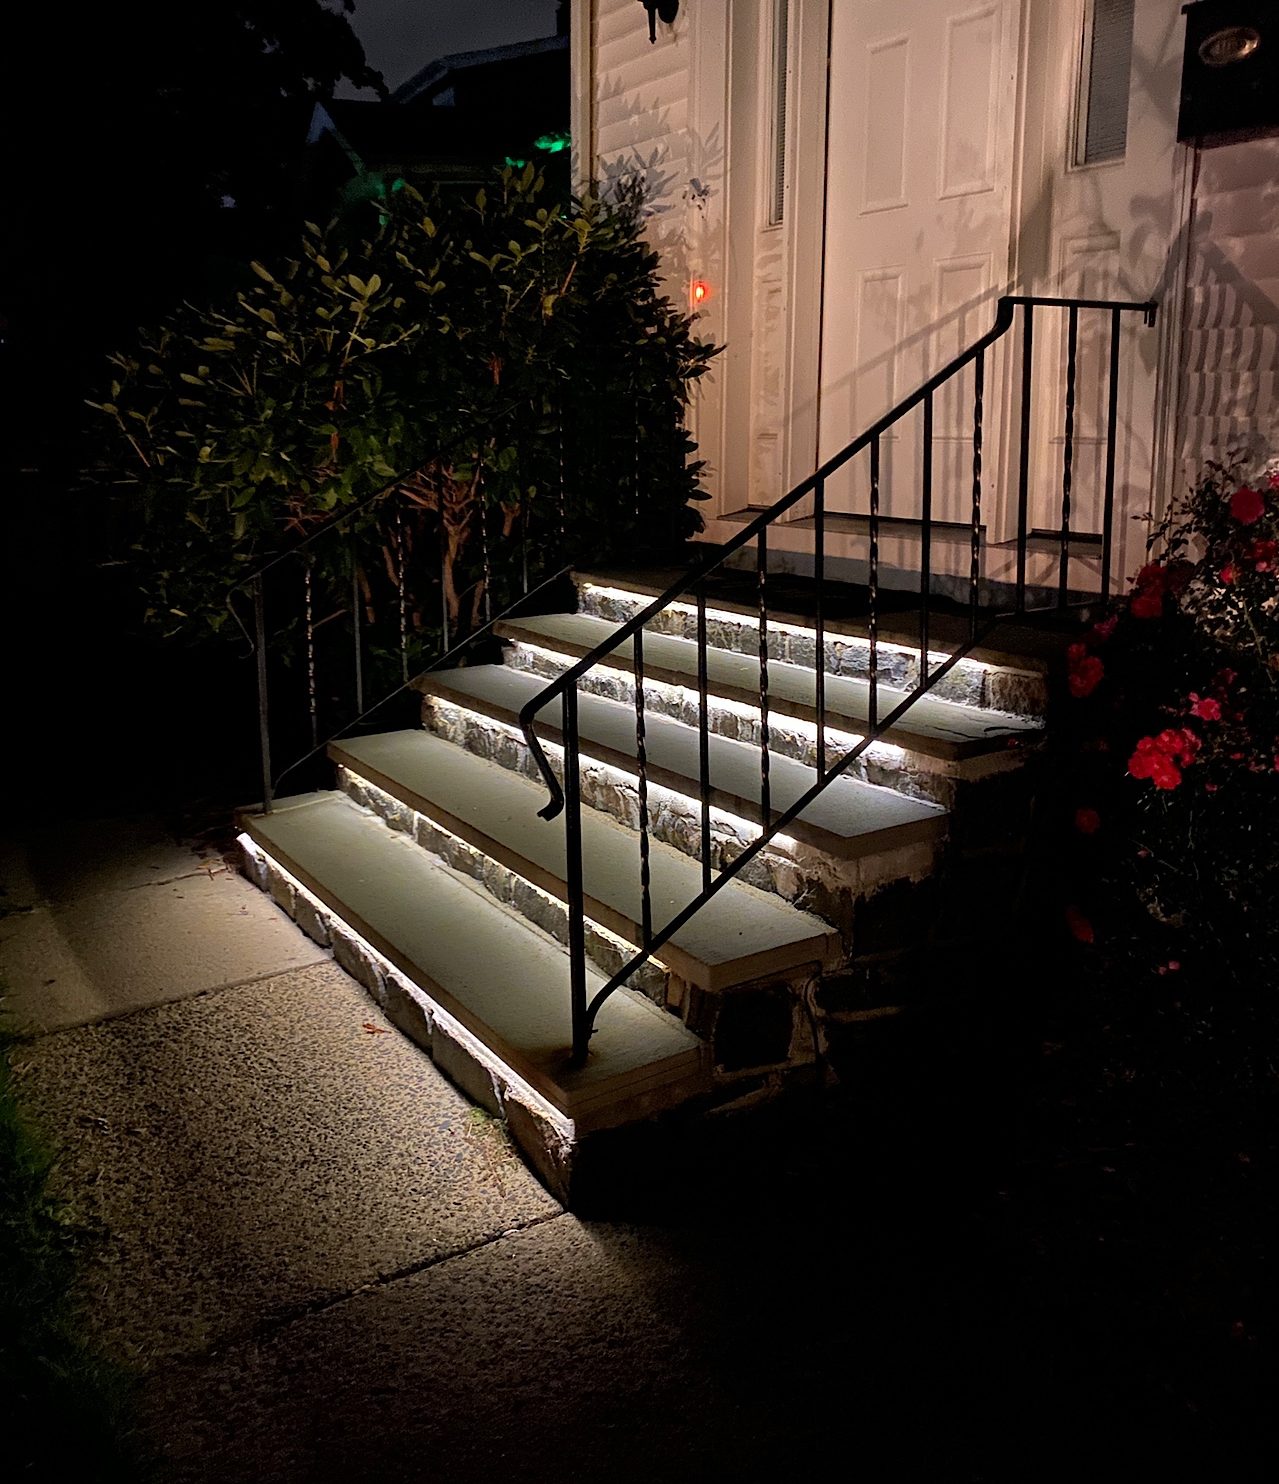
The final product